X-Git-Url: https://git.njae.me.uk/?a=blobdiff_plain;ds=inline;f=README.md;h=52e292afc72b36a336bcb907b849694f6150313f;hb=refs%2Fheads%2Fmaster;hp=a9a90f80969c3a09cbd6d3e10fbd432fd0ed0851;hpb=40ac5ed45ce5ab6927ed1cecc09c367f5c0c4c88;p=miniband.git
diff --git a/README.md b/README.md
index a9a90f8..52e292a 100644
--- a/README.md
+++ b/README.md
@@ -1,9 +1,16 @@
-# Code Club - Mini Band Project
+Code Club - Mini Band Project
+=============================
+
+ Make your own mini band!
You and your friends can form your own finger-sized band and rock out using Raspberry Pi and Arduino.
Learn how to build circuits with sensors and outputs and write a simple programme to control your instruments.
+## Instructions
+
+The instructions are in the [writeup directory](https://github.com/NeilNjae/miniband/tree/master/writeup); you'll probably want the [instructions PDF](https://github.com/NeilNjae/miniband/tree/master/writeup/miniband.pdf). Code samples are in the [release directory](https://github.com/NeilNjae/miniband/tree/master/release).
+
## You will make:
* A guitar
@@ -13,12 +20,11 @@ Learn how to build circuits with sensors and outputs and write a simple programm
## You will need:
* 1 x Raspberry Pi (plus monitor and power supply)
-* USB hub
-* 2 x Arduino Uno boards (with USB cables)
+* 1 x Arduino Uno boards (with USB cables)
* 1 x strip potentiometer
* 2 x tilt sensors
* 4 x piezo buzzers (the type in greetings cards, easy to get from Maplin)
-* 10K resistors
+* 7 Ã 10K resistors
* Bread boards (1 per instrument)
* Card
* Sugru (or some other modelling material)
@@ -34,126 +40,20 @@ Learn how to build circuits with sensors and outputs and write a simple programm
* IDE developer environment for Arduino
* Py Serial library
-
-## Useful links:
-
-* [Pictures](http://bit.ly/codeclubminiband)
-* [Ardunio code](https://github.com/KatJoyWhite/miniband/tree/master/arduino)
-
-
-
-## Pull-down Resistors
-
-Youâll find your analogue inputs receive signal when you donât expect them to.
-This is because thereâs electricty floating around in the system, or something like that.
-
-To fix this, you need to wire each input to ground, through a 10KΩ resistor.
-
-A better explanation can be found [here](http://arduino.cc/en/Tutorial/DigitalPins).
-
-
-
## Drum Kit
Make your own mini band!
You and your friends can form your own finger-sized band and rock out using Raspberry Pi and Arduino.
Learn how to build circuits with sensors and outputs and write a simple programme to control your instruments.
+## Instructions
+
+The instructions are in the [writeup directory](https://github.com/NeilNjae/miniband/tree/master/writeup); you'll probably want the [instructions PDF](https://github.com/NeilNjae/miniband/tree/master/writeup/miniband.pdf). Code samples are in the [release directory](https://github.com/NeilNjae/miniband/tree/master/release).
+
## You will make:
* A guitar
@@ -13,12 +20,11 @@ Learn how to build circuits with sensors and outputs and write a simple programm
## You will need:
* 1 x Raspberry Pi (plus monitor and power supply)
-* USB hub
-* 2 x Arduino Uno boards (with USB cables)
+* 1 x Arduino Uno boards (with USB cables)
* 1 x strip potentiometer
* 2 x tilt sensors
* 4 x piezo buzzers (the type in greetings cards, easy to get from Maplin)
-* 10K resistors
+* 7 Ã 10K resistors
* Bread boards (1 per instrument)
* Card
* Sugru (or some other modelling material)
@@ -34,126 +40,20 @@ Learn how to build circuits with sensors and outputs and write a simple programm
* IDE developer environment for Arduino
* Py Serial library
-
-## Useful links:
-
-* [Pictures](http://bit.ly/codeclubminiband)
-* [Ardunio code](https://github.com/KatJoyWhite/miniband/tree/master/arduino)
-
-
-
-## Pull-down Resistors
-
-Youâll find your analogue inputs receive signal when you donât expect them to.
-This is because thereâs electricty floating around in the system, or something like that.
-
-To fix this, you need to wire each input to ground, through a 10KΩ resistor.
-
-A better explanation can be found [here](http://arduino.cc/en/Tutorial/DigitalPins).
-
-
-
## Drum Kit
 <
-### 1. Make your drums
-
-Take your 4 piezo buzzers and attach a ring of Sugru (or other modelling material) as shown in the picture.
-This will increase the flexibility and resonance of the sensors. Let the sugru set.
-
-
<
-### 1. Make your drums
-
-Take your 4 piezo buzzers and attach a ring of Sugru (or other modelling material) as shown in the picture.
-This will increase the flexibility and resonance of the sensors. Let the sugru set.
-
- -
-
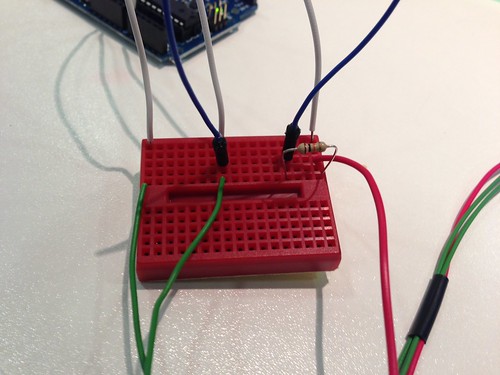
-### 2. Connect the circuit
-
-Piezo buzzers generate a small charges when you tap them, so they donât need a power source.
-Connect one lead from your buzzer to one of your analogue inputs, and connect the other lead to ground.
-Repeat for each of your drums. It is easiest to use a bread board for making your circuit.
-Look at the picture for an example.
-
-
-
-
-### 2. Connect the circuit
-
-Piezo buzzers generate a small charges when you tap them, so they donât need a power source.
-Connect one lead from your buzzer to one of your analogue inputs, and connect the other lead to ground.
-Repeat for each of your drums. It is easiest to use a bread board for making your circuit.
-Look at the picture for an example.
-
- -
-### 3. Program the Arduino
-
-Find the appropriate code from the respository and upload to your Ardunio board.
-
-
-### 4. Set up in Scratch
-
-Find four different drum sounds (or whatever sounds you'd like your drums to make!). Upload the sounds to Scratch.
-
-
## Guitar
-
-### 3. Program the Arduino
-
-Find the appropriate code from the respository and upload to your Ardunio board.
-
-
-### 4. Set up in Scratch
-
-Find four different drum sounds (or whatever sounds you'd like your drums to make!). Upload the sounds to Scratch.
-
-
## Guitar
 -### 1. Make your guitar
-
-Grab your strip potentiomater, a piece of thin card, and a pencil.
-Lightly draw round your potentiometer on the card and then use this as a guide to draw out your guitar shape.
-(The potentiomater will be the fret board of your guitar).
-Cut out and colour in the guitar and stick down the potentiomater.
-Tape a pencil or stick to the back of the guitar to make it stiffen the fret board.
-
-### 2. Connect the circuit
-
-The potentiomater strip adjusts resistance, so you will need to feed it some electricity.
-Run +5V into one of the stripâs outer pins, and ground into the other outer pin.
-It doesnât matter which way around you connect these, but it will affect which the direction
-the fretboard runs (high and the top, low at the bottom or vice-versa).
-
-Signal will come from the centre pin, so connect that to one of your analogue inputs and you should be good to go.
-
-
-### 1. Make your guitar
-
-Grab your strip potentiomater, a piece of thin card, and a pencil.
-Lightly draw round your potentiometer on the card and then use this as a guide to draw out your guitar shape.
-(The potentiomater will be the fret board of your guitar).
-Cut out and colour in the guitar and stick down the potentiomater.
-Tape a pencil or stick to the back of the guitar to make it stiffen the fret board.
-
-### 2. Connect the circuit
-
-The potentiomater strip adjusts resistance, so you will need to feed it some electricity.
-Run +5V into one of the stripâs outer pins, and ground into the other outer pin.
-It doesnât matter which way around you connect these, but it will affect which the direction
-the fretboard runs (high and the top, low at the bottom or vice-versa).
-
-Signal will come from the centre pin, so connect that to one of your analogue inputs and you should be good to go.
-
- -
-### 3. Program the Arduino
-
-Find the appropriate code from the respository and upload to your Ardunio board.
-
-
-### 4. Set up in Scratch
-
-Find five different guitar sounds and upload to Scratch.
-
-
## Maracas
-### 1. Make your maracas
-
-Cut 2 short lengths of drinking straw for your maraca handles.
-Using Sugru (or other modelling material), make 2 maraca heads by rolling it up into balls.
-Push the maraca heads onto the straws and mold into a maraca shape.
-Connect lengths of wire to the connectors of the 2 tilt sensors and then push each sensor into a straw until it presses into the Sugru.
-Leave the Sugru to set.
-
+
-
-### 3. Program the Arduino
-
-Find the appropriate code from the respository and upload to your Ardunio board.
-
-
-### 4. Set up in Scratch
-
-Find five different guitar sounds and upload to Scratch.
-
-
## Maracas
-### 1. Make your maracas
-
-Cut 2 short lengths of drinking straw for your maraca handles.
-Using Sugru (or other modelling material), make 2 maraca heads by rolling it up into balls.
-Push the maraca heads onto the straws and mold into a maraca shape.
-Connect lengths of wire to the connectors of the 2 tilt sensors and then push each sensor into a straw until it presses into the Sugru.
-Leave the Sugru to set.
-
+ -### 2. Connect the circuit
-Connect the +5V port on the Arduino board to one of the pins on the tilt switch (it doesn't matter which way round).
-Connect the other pin to an empty digital input on the board.
-
-
-### 3. Program the Arduino
-
-Find the appropriate code from the respository and upload to your Ardunio board.
-
-
-### 4. Set up in Scratch
-
-Find a maraca / shaker sound and upload to Scratch.
-
-
-## Python glueware
-
-Download the music-maker-hander.py file from the repository. Run it with
- python music-maker-handler.py
-This program sets up a listener for each instrument. When it detects that an instrument has been played, it sends a couple of signals to Scratch.
-The first signal appears in Scratch as a sensor value and is the volume (for drums), pitch (for the guitar), or ignored (for the maracas).
-The second signal is a broadcast message that makes Scratch play the sound in the instrument.
-
-
-## Scratch front end
-
-The Scratch file, music-maker, makes the sounds. It responds to the signals from the Python handler above by playing the appropriate sounds. It also does some visual feedback for the insturments.
+## Useful links:
+* [Pictures from the hack day where this was put together](http://bit.ly/codeclubminiband)
+* [Ardunio code](https://github.com/KatJoyWhite/miniband/tree/master/arduino)
-### 2. Connect the circuit
-Connect the +5V port on the Arduino board to one of the pins on the tilt switch (it doesn't matter which way round).
-Connect the other pin to an empty digital input on the board.
-
-
-### 3. Program the Arduino
-
-Find the appropriate code from the respository and upload to your Ardunio board.
-
-
-### 4. Set up in Scratch
-
-Find a maraca / shaker sound and upload to Scratch.
-
-
-## Python glueware
-
-Download the music-maker-hander.py file from the repository. Run it with
- python music-maker-handler.py
-This program sets up a listener for each instrument. When it detects that an instrument has been played, it sends a couple of signals to Scratch.
-The first signal appears in Scratch as a sensor value and is the volume (for drums), pitch (for the guitar), or ignored (for the maracas).
-The second signal is a broadcast message that makes Scratch play the sound in the instrument.
-
-
-## Scratch front end
-
-The Scratch file, music-maker, makes the sounds. It responds to the signals from the Python handler above by playing the appropriate sounds. It also does some visual feedback for the insturments.
+## Useful links:
+* [Pictures from the hack day where this was put together](http://bit.ly/codeclubminiband)
+* [Ardunio code](https://github.com/KatJoyWhite/miniband/tree/master/arduino)